
Setting Up Document Automation for Loans
Document Automation lets Lendiom automatically generate and physically mail documents to borrowers when a loan's status changes. Instead of manually creating and sending notices each time a loan becomes late or enters default, you define rules once and the system handles the rest.
Prerequisites
Before setting up document automation, you need:
- Document Builder addon enabled - Go to Org Settings > Billing > Addons and enable the Document Builder addon ($10/month) if you have not already.
- At least one published (Active) template - You need a template with an Active status. Draft templates cannot be used in automation rules. See the Creating a Document Template guide for instructions.
- Default Signing User configured (recommended) - If your templates use
user.*variables (e.g.,{{user.fullName}}), configure a Default Signing User so those variables are populated in automated documents. Go to Documents > Builder > Settings > Default Signing User and select a team member. Without this, user variables will be blank in automatically generated documents.
How It Works
You create automation rules that pair a status trigger with a document template and mailing options. When a loan transitions to one of the supported statuses, the system generates the document from the selected template (populated with the loan's data) and mails it to the borrower.
The supported loan status triggers are:
- Late - The loan payment is past due.
- In Default - The loan has been in a late status beyond the configured days-until-in-default threshold.
- Defaulted - The loan has been in default beyond the configured defaults-after threshold.
- Repossessed - The loan has been marked as repossessed.
Configuration Levels
Document automation can be configured at two levels:
Organization-Level Defaults
Organization-level defaults apply to all loans (or can be pushed to all loans). This is useful when you want a consistent automation policy across your portfolio.
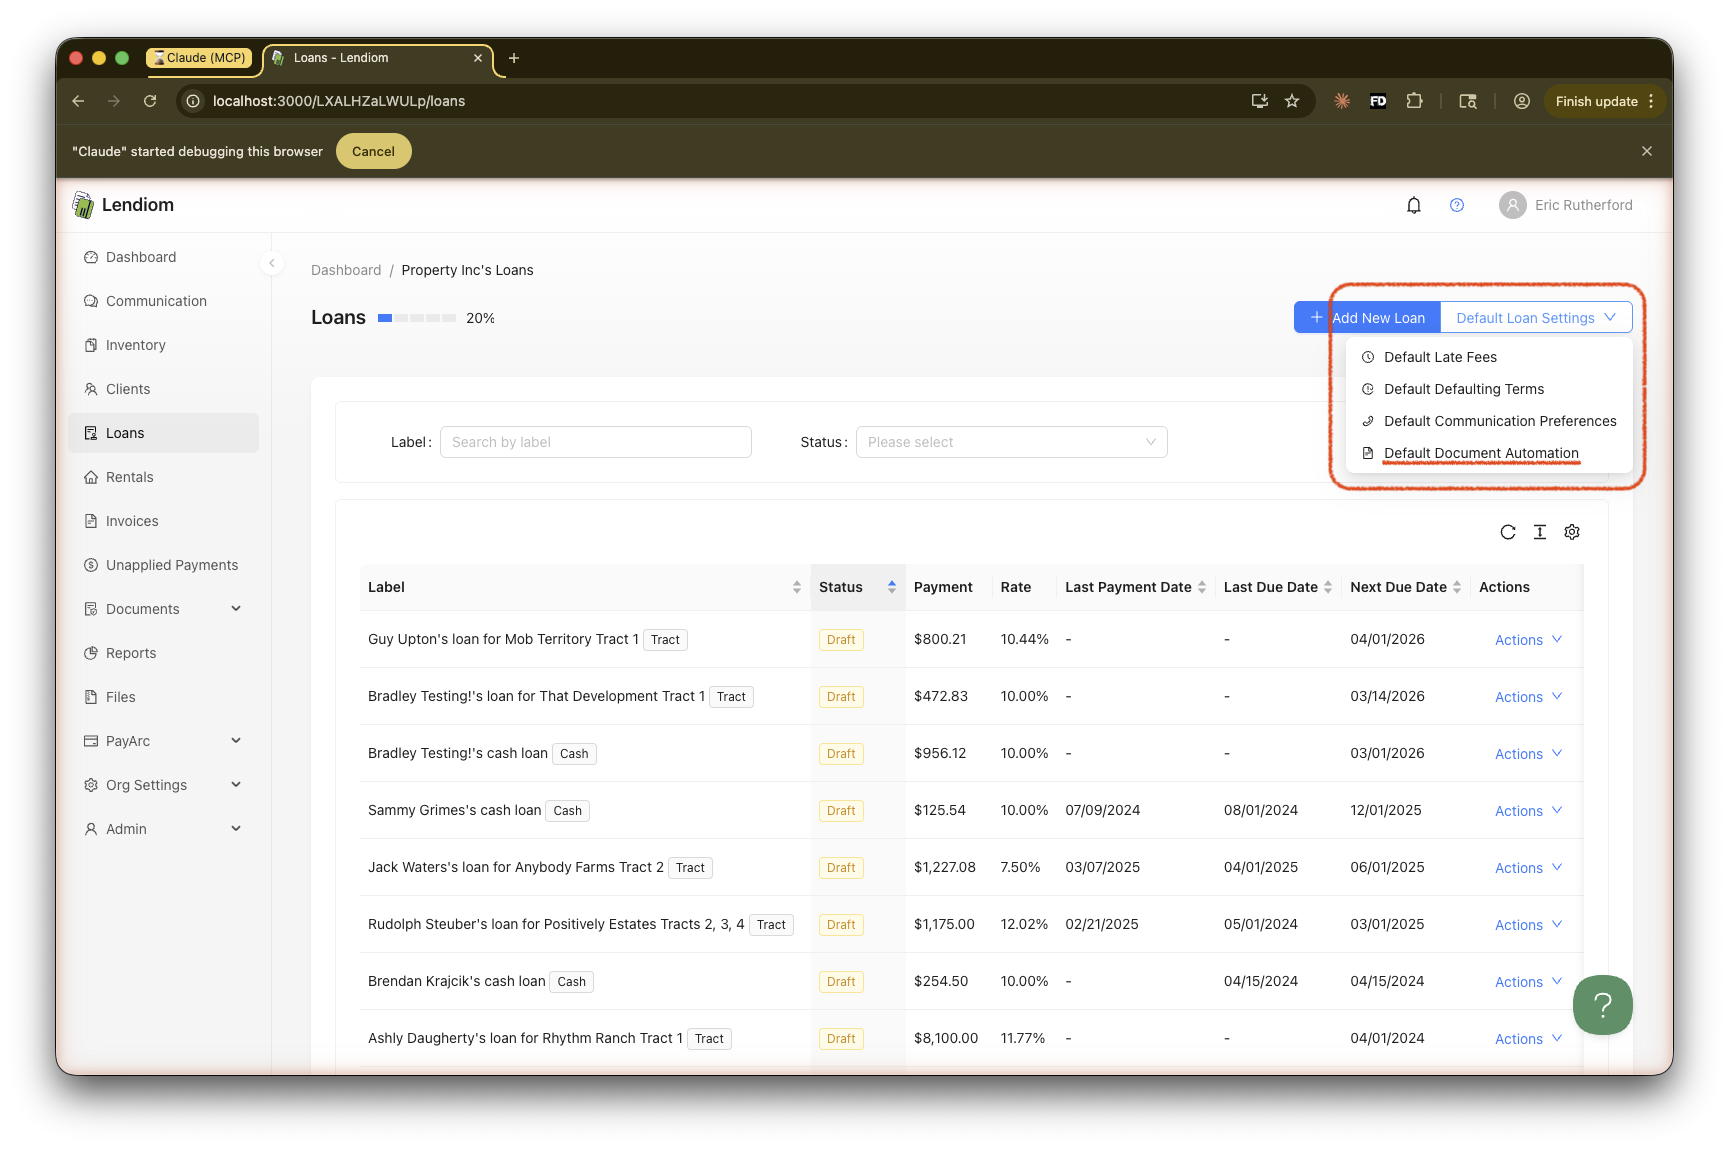
- Navigate to the Loans page from the sidebar.
- Click the Default Loan Settings dropdown button.
- Select Default Document Automation.
The Loan Document Automation Defaults modal will open.
Per-Loan Configuration
You can also configure automation for an individual loan, which overrides the organization defaults for that specific loan.
- Open the loan you want to configure.
- Click the Actions dropdown.
- Select Document Automation.
The Document Automation Configuration modal will open.
Configuring Automation Rules
The automation configuration modal works the same way at both the organization and per-loan levels.
Enabling Automation
At the top of the modal is an Enabled/Disabled toggle. Flip it to Enabled to activate automation. When disabled, no rules will fire regardless of how they are configured.
Adding Rules
- Click the Add Rule button at the bottom of the rules table.
- A new row to input data will appear.
- Configure each column as needed, then click Save.
| Column | Description |
|---|---|
| When Status Becomes | The loan status that triggers this rule. Select from Late, In Default, Defaulted, or Repossessed. |
| Trigger | Only visible when late fee tiers are configured. For Late rules, you can choose whether the rule fires on the status change itself or on a specific late fee tier (e.g., "Tier 1 (15 days)", "Tier 2 (30 days)"). For non-Late statuses, this is always "Status change". |
| Document Template | The published template to use for generating the document. Only Active templates with a matching type (or General) are shown. |
| Mail Class | First Class or Standard. First Class provides faster delivery and tracking options. |
| Extra Service | Only available when Mail Class is First Class. Options are None, Certified, or Certified Return Receipt. |
📝 Multiple Rules
You can add multiple rules to handle different statuses. For example, you might send a standard First Class letter when a loan becomes Late, and a Certified Return Receipt letter when it moves to In Default.
Late Fee Tier Triggers
When a loan (or the organization's default late fee configuration) has late fee tiers configured, an additional Trigger column appears for Late status rules. This allows you to send different notices at different stages of lateness:
- On status change - The rule fires once when the loan first becomes Late.
- Tier 1 (X days), Tier 2 (Y days), etc. - The rule fires when the corresponding late fee tier is applied.
Each status and trigger combination must be unique. You cannot have two rules that both fire on "Late + Tier 1", for example.
Removing Rules
Click the red delete icon on the right side of any rule row to remove it.
Apply to All Loans
At the organization level, an Apply to All Loans toggle appears below the rules table. When enabled and saved, the current automation configuration will be copied to every loan in the organization, overriding any existing per-loan automation settings.
⚠️ Late Fee Tier Compatibility
When using Apply to All with rules that reference specific late fee tiers, be aware that those rules will only fire on loans whose late fee configuration has a matching tier at the same position. Loans with fewer tiers or a different tier setup will silently skip those rules. For example, if you create a rule for "Tier 2" but a loan only has one late fee tier, that rule will never trigger for that loan.
Example Setup
Here is a common automation configuration for a tract loan operation:
| When Status Becomes | Trigger | Template | Mail Class | Extra Service |
| Late | On status change | Late Payment Notice | First Class | None |
| In Default | Status change | In-Default Notice | First Class | Certified |
| Defaulted | Status change | Default Notice | First Class | Certified Return Receipt |
This setup sends a standard letter when the loan first becomes late, a certified letter when it enters in-default, and a certified return receipt letter when it defaults, providing escalating documentation of communication at each stage.
Rentals
Document automation is also available for rentals with the equivalent status triggers: Late, Eviction, Evicted, and Terminated. The configuration works identically - navigate to the Rentals page and use the Default Rental Settings dropdown, or configure it per-rental from the individual rental's Actions menu.